How to Create an Audio Tour - Step by Step!

Stephen Canis
January 12, 2018

The following guide will walk you through the process of creating an audio tour using YourAudioTour. The site is focused on allowing anyone to quickly create a functional and professional audio tour that they can easily share with the world.

Step 1 - Sign Up For Free

First you have to sign up for free here! You'll receive an activation email - make sure to check your junk folder if you don't see it in a minute or two.

Signing up is required so that we can:

  1. save your audio tour once you start building it, and
  2. recover your account if you forget your password.

Don't worry, we never send spam emails and will NEVER share any of your information with a third party.

Step 2 - Create Your Tour

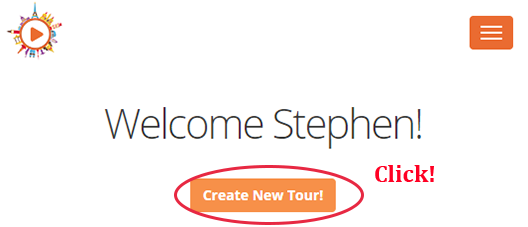
Once you've activated your account creating your tour is as easy as pressing a button.

Now you'll see a form with a few different options:

  1. Title - this is the tour title people will see and can search for on the site and on Google.
  2. Description - this is a short description explaining what your tour is all about, and why someone would be interested in listening!
  3. Tour Location - this the address of the start of the tour, a small map will show this address at the bottom of your tour page
  4. Cover Photo - this is the image that patrons will see if they search your tour.
  5. Stop ID Numbers - this is an advanced feature if you want to have specific stop identification numbers, start with automatic!

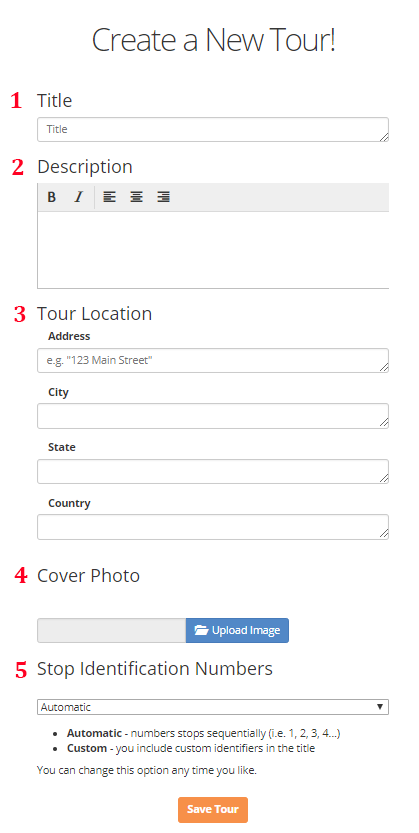
Once you've entered all your information click save and you'll be taken to your tour page! Don't worry about getting everything perfect - you can always come back and edit any aspect of your tour in the future.

Step 3 - Create Your Stops

There is no tour if there are no stops along the way! On the tours page you can click the "New Stop" button to create your first stop. You'll be taken to another form with a few different options:

  1. Title - this is the title of the particular stop.
  2. Description - this is the informational piece of the stop, if you chose the text-to-speech option this text will automatically create the audio for your stop when you press save!
  3. Audio Options - if you'd like to automatically create the audio from your description chose text to speech. If you have your own audio files you choose the "Custom Audio" option.
  4. Photo - this is the photo for the stop and is great to direct people to where they should be standing to get the most out of the audio information!

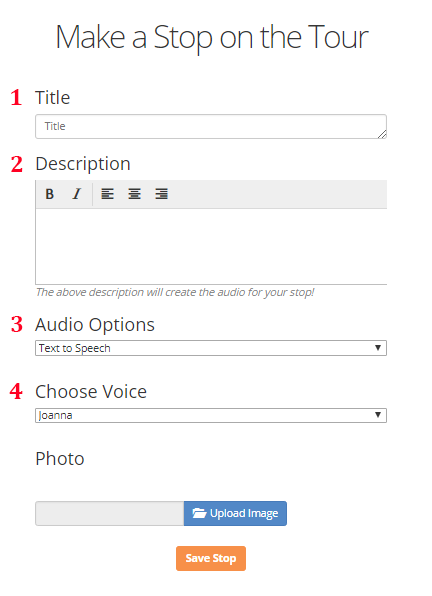
Click "Save Stop" when you're ready and you're well on your way to creating your full tour!

Step 4 - Finalize Your Tour and Release it into the Wild!

Now it's time to enter the rest of your stops and make sure the tour is just the way you want it. Once your tour is all finished it's time to share it with the world!


Interested in making an audio tour? Sign up and create your own free tour in minutes!

Get Started Features